Resourcesクラスを使ったリソースの参照
今までのサンプルではプログラムの中でリソースの利用はレイアウト関係を主に使っていました。今回はプログラムの中からリソースとして定義された文字列や色、画像などを参照する方法を確認します。
リソースを利用するにはResourcesクラスのオブジェクトをまず取得します。Activityクラスで定義されているgetResourcesメソッドを使用します。
getResources
public Resources getResources()
Return a Resources instance for your application's package.
戻り値としてandroid.content.res.Resourcesクラスのオブジェクトを取得できます。
具体的には次のように記述します。
Resources res = getResources();
Resourcesクラスでは、リソースIDを引数に指定すると対応するリソースを取得できるメソッドがいくつか用意されています。例えば文字列リソースを取得するにはResourcesクラスで定義されているgetStringメソッドを使用します。
getString
public String getString(int id)
Return the string value associated with a particular resource ID. It will be stripped
of any styled text information.

Parameters:
  id  The desired resource identifier, as generated by the aapt tool. This integer
    encodes the package, type, and resource entry. The value 0 is an invalid identifier.
Returns:
  String The string data associated with the resource, stripped of styled text
    information.
Throws:
  Resources.NotFoundException  Throws NotFoundException if the given ID does not exist.
引数に文字列リソースのリソースIDを指定すると、対応する文字列リソースを取得します。
具体的には次のように記述します。
Resources res = getResources();
String titleString = res.getString(R.string.title);
同じようにリソースIDを引数に指定してリソースを取得するためのメソッドが用意されています。以下のその一部を記載しました。
boolean getBoolean(int id)
int getColor(int id)
float getDimension(int id)
Drawable getDrawable(int id)
int getInteger(int id)
Movie getMovie(int id)
String[] getStringArray(int id)
CharSequence getText(int id)
Contextクラスのメソッドを使用
文字列リソースに関しては先ほどのようにResourcesクラスのオブジェクトを経由しなくても、Activityクラスの親クラスであるandroid.content.Contextクラスで定義されているgetStringメソッドを使って取得することができます。
getString
public final String getString(int resId)
Return a localized string from the application's package's default string table.

Parameters:
  resId  Resource id for the string
引数に文字列リソースのリソースIDを指定すると、対応する文字列リソースを取得します。
具体的には次のように記述します。
String titleString = getString(R.string.title);
なお文字列リソースを取得する場合は、getStringメソッドの他にgetTextメソッドというものも用意されています。使い分けについては改めて別のページで確認します。
サンプルプログラム
では実際に試してみます。「アクティビティの追加」を参考に「Test5_1Activity」をプロジェクトに追加し、起動時にこのアクティビティが呼び出されるように設定します。
今回はテキストを一つ画面に表示し、表示される文字列と色をリソースから参照して設定してみます。
作成された「Test5_1Activity.java」ファイルを次のように記述します。
package jp.javadrive.resource;

import android.app.Activity;
import android.os.Bundle;
import android.widget.TextView;
import android.content.res.Resources;

public class Test5_1Activity extends Activity {
    @Override
    public void onCreate(Bundle savedInstanceState) {
        super.onCreate(savedInstanceState);

        setContentView(R.layout.test5_1);

        TextView msg_text = (TextView)findViewById(R.id.msg_text);

        msg_text.setText(getText(R.string.msg));
        Resources res = getResources();
        int msg_color = res.getColor(R.color.textcolor);
        msg_text.setTextColor(msg_color);
    }
}
「test5_1.xml」というファイルを作成し、作成したプロジェクトの「res/layout」ディレクトリに配置します。ファイルの中身は次のようにします。
<?xml version="1.0" encoding="utf-8"?>
<LinearLayout xmlns:android="http://schemas.android.com/apk/res/android"
    android:orientation="vertical"
    android:layout_width="fill_parent"
    android:layout_height="fill_parent"
    >
  <TextView
      android:id="@+id/msg_text"
      android:layout_width="wrap_content"
      android:layout_height="wrap_content"
      android:text=""
      />
 </LinearLayout>
続いて作成したプロジェクトの「res/values」ディレクトリに作成されている「strings.xml」ファイルを次のように書き換えます。(もし存在していなかったら新規にファイルを作成して下さい)。
<?xml version="1.0" encoding="utf-8"?>
<resources>
    <string name="msg">press the <i>right</i> button</string>
    <string name="app_name">Sampleプログラム</string>
    <string name="hello">hello</string>
</resources>
最後に「colors.xmlというファイルを作成し、先ほどと同じく作成したプロジェクトの「res/values」ディレクトリに配置します。ファイルの中身は次のようにします。
<?xml version="1.0" encoding="utf-8"?>
<resources>
    <color name="textcolor">#ff8c00</color>
</resources>
では実行してみます。
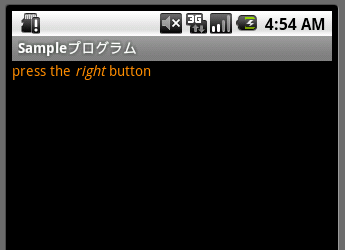
リソースに登録した色と文字列をテキストに設定することができました。
( Written by Tatsuo Ikura )
