- Home ›
- Swing ›
- ラジオボタンの作成(JRadioButtonクラス) ›
- HERE
選択状態時の画像の設定
ラジオボタンに独自の画像を設定した場合、ラジオボタンが選択されている状態かそうでないのかが分からなくなります。その為、ラジオボタンに画像を設定する場合は、合わせてラジオボタンが選択されている時に別の画像を表示するように設定をします。この結果、ラジオボタンの選択/非選択の状態を見るだけで判別できます。
ラジオボタンで選択された時の画像を設定するにはJRadioButtonクラスの親クラスであるAbstractButtonクラスで用意されているsetSelectedIconメソッドを使います。
setSelectedIcon
public void setSelectedIcon(Icon selectedIcon)
選択された状態のボタンのアイコンを設定します。

パラメータ:
  selectedIcon - 「選択されたボタン」の表示に使用されるアイコン
引数には表示したい画像を表すIconインターフェースを実装したクラスのオブジェクトを指定します。JavaではIconインターフェースを実装したクラスとしてImageIconクラスが用意されており、今回はImageIconクラスのオブジェクトを指定してみます。(ImageIconクラスについては「ImageIconクラス」を参照して下さい)。
実際の使い方は次のようになります。
ImageIcon icon = new ImageIcon("./img/sample.png");
ImageIcon icon_select = new ImageIcon("./img/select.png");

JRadioButton radio = new JRadioButton(icon);
radio..setSelectedIcon(icon_select);
上記ではチェックボックスが選択されていない時は「sample.png」を表示し、選択されている時は「select.png」を表示します。
サンプルプログラム
では実際に試してみます。
import javax.swing.JFrame;
import javax.swing.JPanel;
import javax.swing.JRadioButton;
import javax.swing.ButtonGroup;
import javax.swing.ImageIcon;
import java.awt.Container;
import java.awt.BorderLayout;

class SSample11_1 extends JFrame{
  public static void main(String args[]){
    SSample11_1 frame = new SSample11_1("タイトル");
    frame.setVisible(true);
  }

  SSample11_1(String title){
    setTitle(title);
    setBounds(100, 100, 300, 250);
    setDefaultCloseOperation(JFrame.EXIT_ON_CLOSE);

    JPanel p = new JPanel();

    ImageIcon icon1 = new ImageIcon("./calculator.png");
    ImageIcon icon2 = new ImageIcon("./camera.png");
    ImageIcon icon3 = new ImageIcon("./clock.png");
    ImageIcon icon4 = new ImageIcon("./computer.png");

    ImageIcon sicon1 = new ImageIcon("./select_calculator.png");
    ImageIcon sicon2 = new ImageIcon("./select_camera.png");
    ImageIcon sicon3 = new ImageIcon("./select_clock.png");
    ImageIcon sicon4 = new ImageIcon("./select_computer.png");

    JRadioButton radio1 = new JRadioButton(icon1);
    radio1.setSelectedIcon(sicon1);
    JRadioButton radio2 = new JRadioButton(icon2, true);
    radio2.setSelectedIcon(sicon2);
    JRadioButton radio3 = new JRadioButton(icon3);
    radio3.setSelectedIcon(sicon3);
    JRadioButton radio4 = new JRadioButton(icon4);
    radio4.setSelectedIcon(sicon4);

    ButtonGroup group = new ButtonGroup();
    group.add(radio1);
    group.add(radio2);
    group.add(radio3);
    group.add(radio4);

    p.add(radio1);
    p.add(radio2);
    p.add(radio3);
    p.add(radio4);

    Container contentPane = getContentPane();
    contentPane.add(p, BorderLayout.CENTER);
  }
}
ではコンパイルを行った上で実行してみます。
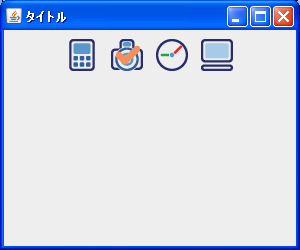
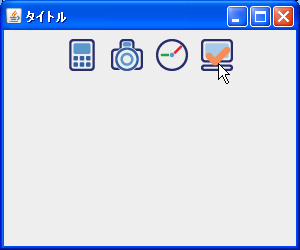
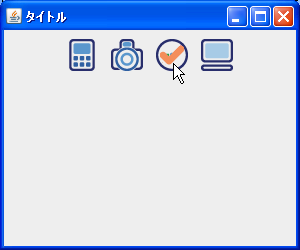
4つのラジオボタンを表示しています。今回のラジオボタンは選択時と非選択時で使用する画像を変えているため、ラジオボタンの状態に合わせて表示される画像が替わり、見ただけでラジオボタンの状態がわかります。
デフォルトで2番目のラジオボタンを選択状態にしてあります。では他のラジオボタンをクリックし、状態を変更させてみます。

( Written by Tatsuo Ikura )
