- Home ›
- Swing ›
- ボタンの作成(JButtonクラス) ›
- HERE
文字列と画像の位置関係を設定
文字列と画像を両方ともボタンに表示した場合に、文字列と画像の位置関係を設定する方法を確認します。デフォルトでは画像の右側にラベルが表示されます。また垂直方向では文字列と画像が中央揃いの位置で表示されます。
画像に対する文字列の水平位置
画像に対する文字列の水平位置を設定するにはJButtonクラスの親クラスであるAbstractButtonクラスで定義されているsetHorizontalTextPositionメソッドを使います。
setHorizontalTextPosition
public void setHorizontalTextPosition(int textPosition)
アイコンに対するテキストの位置 (水平方向) を設定します。

パラメータ:
  textPosition - 次の値のいずれか。
例外:
  IllegalArgumentException - textPosition が上記の正当な値のどれでもない場合
引数には画像に対する文字列の水平位置を指定します。指定できる値は次の通りです。
JButton.LEFT       左詰
JButton.CENTER     中央
JButton.RIGHT      右詰
JButton.LEADING    左詰
JButton.TRAILING   右詰 (デフォルト)
※各値はjavax.swing.SwingConstantsインターフェースで定義されており、JButtonクラスはSwingConstantsインターフェースを実装したクラスです。
※LEADING(先頭)とTRAILING(末)は利用している言語によって位置が変わります。日本語や英語のように左から右へ文字を表示する場合は LEADINGが左詰でTRAILINGが右詰ですが、右から左へ文字を表示するのが普通の言語の場合にはLEADINGが右詰でTRAILINGが左詰となります。
実際の使い方は次のようになります。
ImageIcon icon = new ImageIcon("./img/sample.png");

JButton button = new JButton("ボタン", icon);
button.setHorizontalTextPosition(JButton.CENTER);
JButton.CENTERを設定した場合、画像の上に重なるように文字列が表示されることになります。
画像に対する文字列の垂直位置
画像に対する文字列の水平位置を設定するにはJButtonクラスの親クラスであるAbstractButtonクラスで定義されているsetVerticalTextPositionメソッドを使います。
setVerticalTextPosition
public void setVerticalTextPosition(int textPosition)
アイコンに対するテキストの位置 (垂直方向) を設定します。

パラメータ:
  textPosition - 次の値のいずれか。
引数には画像に対する文字列の垂直位置を指定します。指定できる値は次の通りです。
JButton.TOP     上端に合わせる
JButton.CENTER  中央(デフォルト)
JButton.BOTTOM  下端に合わせる
※各値はjavax.swing.SwingConstantsインターフェースで定義されており、JButtonクラスはSwingConstantsインターフェースを実装したクラスです。
実際の使い方は次のようになります。
ImageIcon icon = new ImageIcon("./img/sample.png");

JButton button = new JButton("ボタン", icon);
button.setVerticalTextPosition(JButton.TOP);
JButton.TOPを設定した場合は、文字列と画像の上端を合わせるように表示します。画像の上部に文字列が表示されるわけではありません。同じよう世にJButton.BOTTOMを設定した場合は、文字列と画像の下端を合わせるように表示します。
画像と文字列の間隔
画像と文字列の間にどれだけの幅を空けるのかを設定する事も可能です。JButtonクラスの親クラスであるAbstractButtonクラスで定義されているsetIconTextGapメソッドを使います。
setIconTextGap
public void setIconTextGap(int iconTextGap)
アイコンプロパティーとテキストプロパティーが両方とも設定されている場合に、このプロパティー
はそれらの間の距離を定義します。

このプロパティーのデフォルト値は 4 ピクセルです。

パラメータ:
  iconTextGap - アイコンとテキストの距離
引数には文字列と画像の距離をピクセル単位で指定します。デフォルトの値は4ピクセルで、画像と文字列が4ピクセル離れて表示されています。
実際の使い方は次のようになります。
ImageIcon icon = new ImageIcon("./img/sample.png");

JButton button = new JButton("ボタン", icon);
button.setIconTextGap(10);
上記の場合、ボタンに表示されるアイコンとテキストの間隔は10ピクセルに設定されます。
サンプルプログラム
では実際に試してみます。
import javax.swing.JFrame;
import javax.swing.JPanel;
import javax.swing.JButton;
import javax.swing.ImageIcon;
import java.awt.Container;
import java.awt.BorderLayout;
import java.awt.Dimension;

class SSample9_1 extends JFrame{
  public static void main(String args[]){
    SSample9_1 frame = new SSample9_1("タイトル");
    frame.setVisible(true);
  }

  SSample9_1(String title){
    setTitle(title);
    setBounds(100, 100, 480, 300);
    setDefaultCloseOperation(JFrame.EXIT_ON_CLOSE);

    JPanel p = new JPanel();

    ImageIcon icon1 = new ImageIcon("./board.png");
    ImageIcon icon2 = new ImageIcon("./hasami.png");
    ImageIcon icon3 = new ImageIcon("./bag.png");
    ImageIcon icon4 = new ImageIcon("./dentaku.png");

    JButton button1 = new JButton("text", icon1);
    button1.setPreferredSize(new Dimension(140,80));
    button1.setHorizontalTextPosition(JButton.LEFT);
    button1.setVerticalTextPosition(JButton.TOP);

    JButton button2 = new JButton("board", icon1);
    button2.setPreferredSize(new Dimension(140,80));
    button2.setHorizontalTextPosition(JButton.LEFT);
    button2.setVerticalTextPosition(JButton.CENTER);

    JButton button3 = new JButton("text", icon1);
    button3.setPreferredSize(new Dimension(140,80));
    button3.setHorizontalTextPosition(JButton.LEFT);
    button3.setVerticalTextPosition(JButton.BOTTOM);

    JButton button4 = new JButton("text", icon2);
    button4.setPreferredSize(new Dimension(140,80));
    button4.setHorizontalTextPosition(JButton.LEFT);
    button4.setVerticalTextPosition(JButton.CENTER);

    JButton button5 = new JButton("text", icon2);
    button5.setPreferredSize(new Dimension(140,80));
    button5.setHorizontalTextPosition(JButton.CENTER);
    button5.setVerticalTextPosition(JButton.CENTER);

    JButton button6 = new JButton("text", icon2);
    button6.setPreferredSize(new Dimension(140,80));
    button6.setHorizontalTextPosition(JButton.RIGHT);
    button6.setVerticalTextPosition(JButton.CENTER);

    JButton button7 = new JButton("text", icon3);
    button7.setPreferredSize(new Dimension(140,80));

    JButton button8 = new JButton("text", icon3);
    button8.setPreferredSize(new Dimension(140,80));
    button8.setIconTextGap(15);

    JButton button9 = new JButton("text", icon3);
    button9.setPreferredSize(new Dimension(140,80));
    button9.setIconTextGap(30);

    p.add(button1);
    p.add(button2);
    p.add(button3);
    p.add(button4);
    p.add(button5);
    p.add(button6);
    p.add(button7);
    p.add(button8);
    p.add(button9);

    Container contentPane = getContentPane();
    contentPane.add(p, BorderLayout.CENTER);
  }
}
ではコンパイルを行った上で実行してみます。

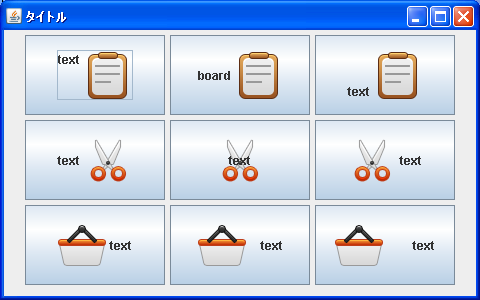
上段の3つのボタンは文字列と画像の垂直位置を変えて表示しています。中段の3つのボタンは文字列と画像の水平位置を変えて表示しています。下段の3つのボタンは文字列と画像の間の間隔を変えて表示しています。
( Written by Tatsuo Ikura )

 JavaDrive