- Home ›
- Swing ›
- ボタンの作成(JButtonクラス) ›
- HERE
画像の表示
ボタンは文字列だけではなく画像を表示することも可能です。ここではボタンに画像を表示する方法を確認します。
コンストラクタを使う
まずはJButtonクラスのコンストラクタで表示する画像を指定する方法を確認します。
JButton
public JButton(Icon icon)
アイコン付きのボタンを生成します。

パラメータ:
  icon - ボタン上に表示するアイコンイメージ
引数には表示したい画像を表すIconインターフェースを実装したクラスのオブジェクトを指定します。JavaではIconインターフェースを実装したクラスとしてImageIconクラスが用意されており、今回はImageIconクラスのオブジェクトを指定してみます。(ImageIconクラスについては「ImageIconクラス」を参照して下さい)。
また文字列と画像を同時に表示することも可能です。その場合は次のコンストラクタを使います。
JButton
public JButton(String text, Icon icon)
初期テキストおよびアイコン付きのボタンを生成します。

パラメータ:
  text - ボタンのテキスト
  icon - ボタン上に表示するアイコンイメージ
1番目の引数には表示する文字列を表すStringクラスのオブジェクト、2番目の引数には前のコンストラクタと同じくIconインターフェースを実装したクラスのオブジェクトを指定します。
文字列と画像を同時に表示する場合に、どのような位置関係で文字列と画像を表示するのかについては別のページで確認します。
実際の使い方は次のようになります。
ImageIcon icon = new ImageIcon("./img/sample.png");

JButton button1 = new JButton(icon);
JButton button2 = new JButton("ボタン", icon);
表示画像の設定
ボタンを作成した後で表示される画像を設定したり再設定したりすることができます。画像を設定するにはJButtonクラスの親クラスであるAbstractButtonクラスで定義されているsetIconメソッドを使います。
setIcon
public void setIcon(Icon defaultIcon)
ボタンのデフォルトのアイコンを設定します。明示的な指定がない場合、このアイコンはボタンが
「押された」状態、および「無効な」状態を示すアイコンにも使用されます。

パラメータ:
  defaultIcon - デフォルト状態の表示に使用されるアイコン
引数にはコンストラクタで指定した場合と同じくIconインターフェースを実装したクラスのオブジェクトを指定します。
実際の使い方は次のようになります。
JButton button = new JButton("ボタン");

ImageIcon icon = new ImageIcon("./img/sample.png");
button.setIcon(icon);
setIconメソッドはボタンに文字列が設定されているかどうかに関わりなく実行することができます。逆に画像が設定されているボタンに対してsetTextメソッドを使って文字列を設定することもできます。
ImageIcon icon = new ImageIcon("./img/sample.png");
JButton button = new JButton(icon);

button.setText("ボタン");
サンプルプログラム
では実際に試してみます。
import javax.swing.JFrame;
import javax.swing.JPanel;
import javax.swing.JButton;
import javax.swing.ImageIcon;
import java.awt.Container;
import java.awt.BorderLayout;

class SSample8_1 extends JFrame{
  public static void main(String args[]){
    SSample8_1 frame = new SSample8_1("タイトル");
    frame.setVisible(true);
  }

  SSample8_1(String title){
    setTitle(title);
    setBounds(100, 100, 300, 250);
    setDefaultCloseOperation(JFrame.EXIT_ON_CLOSE);

    JPanel p = new JPanel();

    ImageIcon icon1 = new ImageIcon("./board.png");
    JButton button1 = new JButton(icon1);

    ImageIcon icon2 = new ImageIcon("./hasami.png");
    JButton button2 = new JButton("hasami", icon2);

    JButton button3 = new JButton("dentaku");
    ImageIcon icon3 = new ImageIcon("./dentaku.png");
    button3.setIcon(icon3);

    ImageIcon icon4 = new ImageIcon("./bag.png");
    JButton button4 = new JButton(icon4);
    button4.setText("BAG");

    p.add(button1);
    p.add(button2);
    p.add(button3);
    p.add(button4);

    Container contentPane = getContentPane();
    contentPane.add(p, BorderLayout.CENTER);
  }
}
ではコンパイルを行った上で実行してみます。
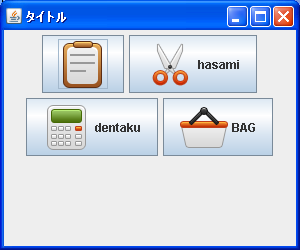
様々な方法で4つのボタンを作成しました。デフォルトでは文字列は画像の右側に配置され、また垂直方向は中央を揃える位置で配置されます。
( Written by Tatsuo Ikura )
