- Home ›
- Swing ›
- ボタンの作成(JButtonクラス) ›
- HERE
前景色と背景色の設定
広告
ボタンに表示される文字列の色である前景色と、文字列の背景の色である背景色の設定方法を確認します。
前景色を設定するにはJButtonクラスの親クラスであるJComponentクラスで用意されているsetForegroundメソッドを使います。
setForeground
public void setForeground(Color fg)
このコンポーネントのフォアグラウンドカラーを設定します。このプロパティーが受け付けられるかど
うかは Look & Feel 次第であり、無視されることもあります。

パラメータ:
  fg - 要求するフォアグラウンド Color
引数には色を表すColorクラスのオブジェクトを指定して下さい。(Colorクラスの使い方は「Colorクラス」を参照して下さい)。
実際の使い方は次のようになります。
JButton button = new JButton("ボタン");
button.setForeground(Color.RED);
次に背景色の設定方法です。背景色を設定するにはJButtonクラスの親クラスであるJComponentクラスで用意されているsetBackgroundメソッドを使います。
setBackground
public void setBackground(Color bg)
このコンポーネントのバックグラウンドカラーを設定します。バックグラウンドカラーは、コンポー
ネントが不透明である場合にのみ、JComponent または ComponentUI の実装のサブクラスによっての
み使用されます。JComponent の直接のサブクラスは、このプロパティーを受け付けるために
paintComponent をオーバーライドする必要があります。

このプロパティーが受け付けられるかどうかは Look & Feel 次第であり、無視されることもあります。

パラメータ:
  bg - 要求するバックグラウンド Color
引数には色を表すColorクラスのオブジェクトを指定して下さい。
実際の使い方は次のようになります。
JButton button = new JButton("ボタン");
button.setBackground(Color.WHITE);
サンプルプログラム
では実際に試してみます。
import javax.swing.JFrame;
import javax.swing.JPanel;
import javax.swing.JButton;
import java.awt.Container;
import java.awt.BorderLayout;
import java.awt.Color;

class SSample2_1 extends JFrame{
  public static void main(String args[]){
    SSample2_1 frame = new SSample2_1("タイトル");
    frame.setVisible(true);
  }

  SSample2_1(String title){
    setTitle(title);
    setBounds(100, 100, 300, 250);
    setDefaultCloseOperation(JFrame.EXIT_ON_CLOSE);

    JPanel p = new JPanel();

    JButton button1 = new JButton("Button");
    JButton button2 = new JButton("Button");
    button2.setForeground(Color.GREEN);
    JButton button3 = new JButton("Button");
    button3.setForeground(Color.RED);
    button3.setBackground(Color.WHITE);

    p.add(button1);
    p.add(button2);
    p.add(button3);

    Container contentPane = getContentPane();
    contentPane.add(p, BorderLayout.CENTER);
  }
}
ではコンパイルを行った上で実行してみます。
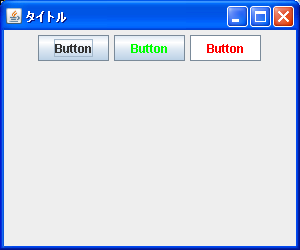
今回は3つのボタンを作成しました。左のボタンが(Windows環境での)デフォルトのボタンです。中央のボタンが前景色を設定した場合、右のボタンが前景色と背景色を設定した場合です。
( Written by Tatsuo Ikura )
