- Home ›
- Apache POIでExcelを操作 ›
- 行 ›
- HERE
セルを作成し行に追加
広告
ワークブック、シート、行と作成したら最後にセルを作成して追加します。
セルを新規作成して行に追加するにはRowインターフェースで用意されているcreateCellメソッドを使います。
createCell
Cell createCell(int column)
Use this to create new cells within the row and return it.

The cell that is returned is a Cell.CELL_TYPE_BLANK. The type can be changed either
through calling setCellValue or setCellType.

Parameters:
  column - - the column number this cell represents
Returns:
  Cell a high level representation of the created cell.
Throws:
  java.lang.IllegalArgumentException - if columnIndex < 0 or greater than the maximum
    number of supported columns (255 for *.xls, 1048576 for *.xlsx)
引数には列番号を指定します。列番号は一番左が0で、順に1、2、と続いていきます。なおExcel2003までのフォーマットでは指定可能な最大値は255、Excel2007のフォーマットでは指定可能な最大値は1048576となっていますので注意が必要です。
作成されるセルのタイプはCell.CELL_TYPE_BLANKに設定されます。セルのタイプについての詳細は別のページで確認します。なおセルは先頭から順に作成する必要はありません。例えば0列目や1列目にセルが存在しなくても2列目のセルを作成することができます。
より詳細なセルの作成方法については「セルの新規作成」を参照して下さい。
実際の使い方は次のようになります。
Workbook wb = new HSSFWorkbook();
Sheet sheet = wb.createSheet();
Row row = sheet.createRow(0);

Cell cell = row.createCell(4);
この場合、0行目の行の4列目にセルを作成します。
サンプルプログラム
実際に試してみましょう。
import org.apache.poi.hssf.usermodel.HSSFWorkbook;
import org.apache.poi.ss.usermodel.Workbook;
import org.apache.poi.ss.usermodel.Sheet;
import org.apache.poi.ss.usermodel.Row;
import org.apache.poi.ss.usermodel.Cell;
import org.apache.poi.ss.usermodel.WorkbookFactory;
import org.apache.poi.openxml4j.exceptions.InvalidFormatException;
import java.io.*;

public class Sample3_1{
  public static void main(String[] args){
    Workbook wb = new HSSFWorkbook();
    Sheet sheet = wb.createSheet();

    Row row1 = sheet.createRow(1);
    Cell cell1_1 = row1.createCell(1);
    Cell cell1_2 = row1.createCell(2);

    Row row2 = sheet.createRow(2);
    Cell cell2_1 = row2.createCell(1);
    Cell cell2_2 = row2.createCell(2);

    cell1_1.setCellValue("花瓶");
    cell1_2.setCellValue("1,800円");
    cell2_1.setCellValue("本棚");
    cell2_2.setCellValue("5,200円");

    FileOutputStream out = null;
    try{
      out = new FileOutputStream("sample3_1.xls");
      wb.write(out);
    }catch(IOException e){
      System.out.println(e.toString());
    }finally{
      try {
        out.close();
      }catch(IOException e){
        System.out.println(e.toString());
      }
    }
  }
}
プログラムを実行すると、2つの行を作成し、それぞれの行に2つのセルを作成した上で値を設定しています。それでは作成されたファイルをExcelで開いてみます。
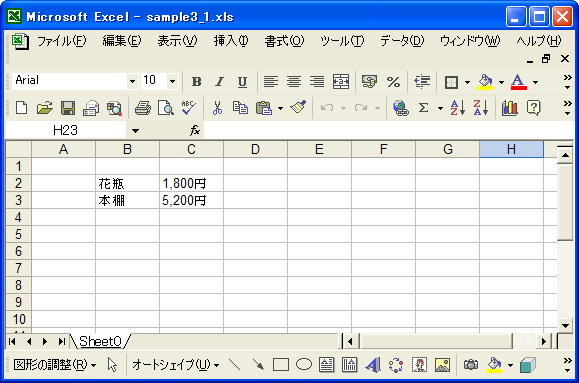
シートの上に値が格納されたセルが4つ表示されていることを確認できます。
( Written by Tatsuo Ikura )
