- Home ›
- Android入門 ›
- Typefaceクラス ›
- HERE
スタイルとフォントファミリーを設定
ボールドやイタリックなどのフォントスタイルと、SERIFやMONOSPACEなどのフォントファミリーを合わせて設定する方法を確認します。「Typeface」クラスで用意されている「create」メソッドを使います。
create
public static Typeface create(Typeface family, int style)
Create a typeface object that best matches the specified existing typeface
and the specified Style. Use this call if you want to pick a new style
from the same family of an existing typeface object. If family is null,
this selects from the default font's family.

Parameters:
  family  May be null. The name of the existing type face.
  style  The style (normal, bold, italic) of the type face. Constants are
    int constants defined by this class.
1番目の引数にはフォントファミリーを表す「Typeface」クラスのオブジェクトを指定します。取りあえず次の3つのどれかを指定しておきます。
Typeface  Typeface.SERIF
Typeface  Typeface.SANS_SERIF
Typeface  Typeface.MONOSPACE
2番目の引数にはフォントスタイルを表す数値を指定します。「Typeface」クラスではint型の値を表す次の定数も定義されており、その中から1つ指定します。
int  Typeface.NORMAL
int  Typeface.BOLD
int  Typeface.ITALIC
int  Typeface.BOLD_ITALIC
フォントファミリー及びフォントスタイルから新しい「Typeface」クラスのオブジェクトを作成します。
具体的には次のように記述します。
import android.app.Activity;
import android.os.Bundle;
import android.widget.TextView;
import android.graphics.Typeface;

public class Test extends Activity {
    @Override public void onCreate(Bundle icicle) {
        super.onCreate(icicle);

        TextView tv = new TextView(this);
        tv.setText("Text");
        tv.setTypeface(Typeface.create(Typeface.SERIF, Typeface.ITALIC));
        setContentView(tv);
    }
}
サンプルプログラム
それでは実際に試してみます。プロジェクトを作成しソースコードを次のように変更しました。
package jp.javadrive.android;

import android.app.Activity;
import android.os.Bundle;
import android.widget.TextView;
import android.widget.LinearLayout;
import android.view.ViewGroup;
import android.graphics.Typeface;

public class Test04_01 extends Activity
{
    private final int WRAP_CONTENT = ViewGroup.LayoutParams.WRAP_CONTENT;

    /** Called with the activity is first created. */
    @Override
    public void onCreate(Bundle icicle)
    {
        super.onCreate(icicle);

        LinearLayout linearLayout = new LinearLayout(this);
        linearLayout.setOrientation(LinearLayout.VERTICAL);
        setContentView(linearLayout);

        TextView tv1 = new TextView(this);
        tv1.setTextSize(24.0f);
        tv1.setText("abcdefg");
        tv1.setTypeface(Typeface.SERIF);
        linearLayout.addView(tv1,
          new LinearLayout.LayoutParams(WRAP_CONTENT, WRAP_CONTENT));

        TextView tv2 = new TextView(this);
        tv2.setTextSize(24.0f);
        tv2.setText("abcdefg");
        tv2.setTypeface(Typeface.create(Typeface.SERIF, Typeface.BOLD_ITALIC));
        linearLayout.addView(tv2,
          new LinearLayout.LayoutParams(WRAP_CONTENT, WRAP_CONTENT));

        TextView tv3 = new TextView(this);
        tv3.setTextSize(24.0f);
        tv3.setText("abcdefg");
        tv3.setTypeface(Typeface.SANS_SERIF);
        linearLayout.addView(tv3,
          new LinearLayout.LayoutParams(WRAP_CONTENT, WRAP_CONTENT));

        TextView tv4 = new TextView(this);
        tv4.setTextSize(24.0f);
        tv4.setText("abcdefg");
        tv4.setTypeface(Typeface.create(Typeface.SANS_SERIF, Typeface.BOLD_ITALIC));
        linearLayout.addView(tv4,
          new LinearLayout.LayoutParams(WRAP_CONTENT, WRAP_CONTENT));

        TextView tv5 = new TextView(this);
        tv5.setTextSize(24.0f);
        tv5.setText("abcdefg");
        tv5.setTypeface(Typeface.MONOSPACE);
        linearLayout.addView(tv5,
          new LinearLayout.LayoutParams(WRAP_CONTENT, WRAP_CONTENT));

        TextView tv6 = new TextView(this);
        tv6.setTextSize(24.0f);
        tv6.setText("abcdefg");
        tv6.setTypeface(Typeface.create(Typeface.MONOSPACE, Typeface.BOLD_ITALIC));
        linearLayout.addView(tv6,
          new LinearLayout.LayoutParams(WRAP_CONTENT, WRAP_CONTENT));
    }
}
ビルド後にエミュレーター上で実行します。
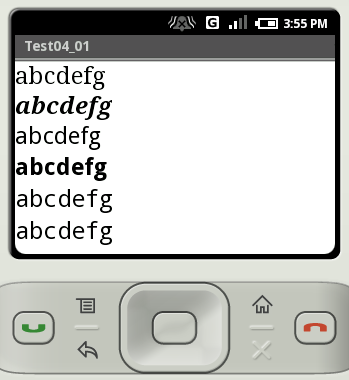
今回はフォントファミリーだけを指定した場合とフォントファミリー+(ボールド+イタリック)を指定した場合のものを、3つのフォントファミリーに対して表示しています。
「Typeface.SERIF」についてはボールドとイタリックの両方が反映されているのに対して「Typeface.SANS_SERIF」はボールドのみ設定が反映されています。また「Typeface.MONOSPACE」についてはボールドもイタリックも設定しても反映はされていません。
( Written by Tatsuo Ikura )
