- Home ›
- Android入門 ›
- TableLayoutクラス ›
- HERE
複数の列にまたがって配置
テーブル形式でビューを配置していく場合、各行に含まれる列の数は基本的に同じですが、複数の列の領域にまたがる形でビューを配置したい場合があります。ここでは配置するビューが何列分の領域にまたがるのかを設定する方法を確認します。
設定を行うには「TableRow」クラスのオブジェクトにビューを追加する時に、レイアウトパラメーターとして「span」フィールドを使って設定を行います。具体的に「android.widget.TableRow.LayoutParams」を使います。
TableRow.LayoutParamsクラス
「TableRow」クラスで利用するレイアウトパラメーターは「android.widget.TableRow.LayoutParams」クラスのオブジェクトを使用します。
「android.widget.TableRow.LayoutParams」クラスは「android.widget.LinearLayout.LayoutParams」クラスのサブクラスです。コンストラクタの1つのは次のようになっています。
LayoutParams
public TableRow.LayoutParams()
Sets the child width to ViewGroup.LayoutParams and the child height
to WRAP_CONTENT.
幅及び高さに関する設定は必要ないので引数無しのコンストラクタを使って「TableRow.LayoutParams」クラスのオブジェクトを作成します。
そして何列にまたがって配置するのかを「TableRow.LayoutParams」クラスの「span」フィールドで設定します。
span
public int span
The number of columns the widgets spans over.
例えば2列にまたがって配置する場合には次のように記述します。
TableRow.LayoutParams trl = new TableRow.LayoutParams();
trl.span = 2;
具体的には次のように記述します。
@Override public void onCreate(Bundle icicle) {
    super.onCreate(icicle);

    TableLayout tableLayout = new TableLayout(this);
    setContentView(tableLayout);

    TextView text = new TextView(this);
    TableRow.LayoutParams rowLayout = new TableRow.LayoutParams();
    rowLayout.span = 2;

    TableRow tableRow = new TableRow(this);
    tableRow.addView(text, rowLayout);
}
レイアウトパラメーターを指定して追加する場合には「TableRow」クラスで用意されている「addView」メソッドではなく、「TableRow」クラスの親クラスである「ViewGroup」クラスで用意されている「addView」メソッドを使います。
サンプルプログラム
それでは実際に試してみます。プロジェクトを作成しソースコードを次のように変更しました。
package jp.javadrive.android;

import android.app.Activity;
import android.os.Bundle;
import android.widget.TextView;
import android.widget.EditText;
import android.widget.TableLayout;
import android.widget.TableRow;
import android.view.ViewGroup;
import android.graphics.Color;
import android.text.Layout.Alignment;

public class Test08_01 extends Activity {
    private final int WC = ViewGroup.LayoutParams.WRAP_CONTENT;
    private final int FP = ViewGroup.LayoutParams.FILL_PARENT;

    @Override public void onCreate(Bundle icicle) {
        super.onCreate(icicle);

        TableLayout tableLayout = new TableLayout(this);
        tableLayout.setColumnStretchable(2, true);
        setContentView(tableLayout);


        TextView text11 = new TextView(this);
        text11.setText("Java");
        text11.setBackgroundColor(Color.MAGENTA);
        text11.setAlignment(Alignment.ALIGN_CENTER);

        TextView text12 = new TextView(this);
        text12.setText("PHP");
        text12.setBackgroundColor(Color.GREEN);
        text12.setAlignment(Alignment.ALIGN_CENTER);

        TextView text13 = new TextView(this);
        text13.setText("Ruby");
        text13.setBackgroundColor(Color.BLUE);
        text13.setAlignment(Alignment.ALIGN_CENTER);

        TableRow tableRow1 = new TableRow(this);
        tableRow1.addView(text11);
        tableRow1.addView(text12);
        tableRow1.addView(text13);


        TextView text21 = new TextView(this);
        text21.setText("MySQL");
        text21.setBackgroundColor(Color.MAGENTA);
        text21.setAlignment(Alignment.ALIGN_CENTER);

        TextView text22 = new TextView(this);
        text22.setText("PostgreSQL");
        text22.setBackgroundColor(Color.GREEN);
        text22.setAlignment(Alignment.ALIGN_CENTER);

        TableRow.LayoutParams rowLayout2 = new TableRow.LayoutParams();
        rowLayout2.span = 2;

        TableRow tableRow2 = new TableRow(this);
        tableRow2.addView(text21);
        tableRow2.addView(text22, rowLayout2);


        TextView text31 = new TextView(this);
        text31.setText("Access");
        text31.setBackgroundColor(Color.MAGENTA);
        text31.setAlignment(Alignment.ALIGN_CENTER);

        TableRow.LayoutParams rowLayout3 = new TableRow.LayoutParams();
        rowLayout3.span = 2;

        TextView text32 = new TextView(this);
        text32.setText("Excel");
        text32.setBackgroundColor(Color.GREEN);
        text32.setAlignment(Alignment.ALIGN_CENTER);

        TableRow tableRow3 = new TableRow(this);
        tableRow3.addView(text31, rowLayout3);
        tableRow3.addView(text32);


        tableLayout.addView(tableRow1, createParam(FP, WC));
        tableLayout.addView(tableRow2, createParam(FP, WC));
        tableLayout.addView(tableRow3, createParam(FP, WC));
    }

    private TableLayout.LayoutParams createParam(int w, int h){
        return new TableLayout.LayoutParams(w, h);
    }
}
ビルド後にエミュレーター上で実行します。
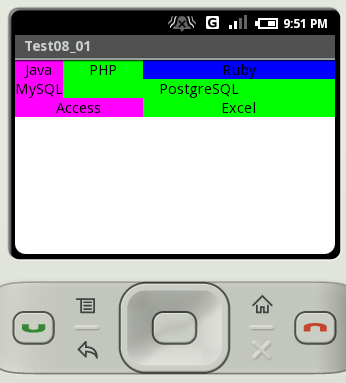
2行目では2列目に配置したビューを2列にまたがって配置しています。3行目では1列目に配置したビューを2列にまたがって配置しています。
( Written by Tatsuo Ikura )
