- Home ›
- Android入門 ›
- TableLayoutクラス ›
- HERE
列を折り畳み可能に設定
広告
行に複数のビュー(列)を追加した場合、各ビューはそれぞれが必要な幅に設定されます。ビューが多かったり幅を広いビューなどがあったりすると、全てのビューが画面の横幅に入りきらない場合があります。このように全ての表示できない場合に、特定のビューを折り畳んで非表示にするように設定することが出来ます。
特定の列を折り畳み可能に設定するには「TableLayout」クラスで用意されている「setColumnCollapsed」メソッドを使います。
setColumnCollapsed
public void setColumnCollapsed(int columnIndex, boolean isCollapsed)
Collapses or restores a given column. When collapsed, a column does not
appear on screen and the extra space is reclaimed by the other columns.
A column is collapsed/restored only when it belongs to a TableRow.

Calling this method requests a layout operation.

Related XML Attributes:
  android:collapseColumns
Parameters:
  columnIndex  the index of the column
  isCollapsed  true if the column must be collapsed, false otherwise
1番目の引数には設定したい列のインデックスを指定します。先頭の列が0番目です。2番目の引数には折り畳み可能にするかどうかを表すboolean型の値を指定します。「true」なら折り畳み可能です。
各列はデフォルトでは折り畳みは行わない設定となっていますので折り畳み可能にしたい列に対して「true」を設定して下さい。
具体的には次のように記述します。
@Override public void onCreate(Bundle icicle) {
    super.onCreate(icicle);

    TableLayout tableLayout = new TableLayout(this);
    tableLayout.setColumnCollapsed(1, true);
    setContentView(tableLayout);
}
サンプルプログラム
それでは実際に試してみます。プロジェクトを作成しソースコードを次のように変更しました。
package jp.javadrive.android;

import android.app.Activity;
import android.os.Bundle;
import android.widget.TextView;
import android.widget.EditText;
import android.widget.TableLayout;
import android.widget.TableRow;
import android.view.ViewGroup;
import android.graphics.Color;

public class Test07_01 extends Activity {
    private final int WC = ViewGroup.LayoutParams.WRAP_CONTENT;
    private final int FP = ViewGroup.LayoutParams.FILL_PARENT;

    @Override public void onCreate(Bundle icicle) {
        super.onCreate(icicle);

        TableLayout tableLayout = new TableLayout(this);
        tableLayout.setColumnCollapsed(1, true);
        setContentView(tableLayout);


        TextView text11 = new TextView(this);
        text11.setText("Nakayama");

        TextView text12 = new TextView(this);
        text12.setText("Tarou");
        text12.setBackgroundColor(Color.LTGRAY);

        TextView text13 = new TextView(this);
        text13.setText("Sotokanda Chiyoda-ku Tokyo");

        TableRow tableRow1 = new TableRow(this);
        tableRow1.addView(text11);
        tableRow1.addView(text12);
        tableRow1.addView(text13);


        TextView text21 = new TextView(this);
        text21.setText("Endou");

        TextView text22 = new TextView(this);
        text22.setText("Kenichirou");
        text22.setBackgroundColor(Color.LTGRAY);

        TextView text23 = new TextView(this);
        text23.setText("daiba Minato-ku Tokyo");

        TableRow tableRow2 = new TableRow(this);
        tableRow2.addView(text21);
        tableRow2.addView(text22);
        tableRow2.addView(text23);


        tableLayout.addView(tableRow1, createParam(FP, WC));
        tableLayout.addView(tableRow2, createParam(FP, WC));
    }

    private TableLayout.LayoutParams createParam(int w, int h){
        return new TableLayout.LayoutParams(w, h);
    }
}
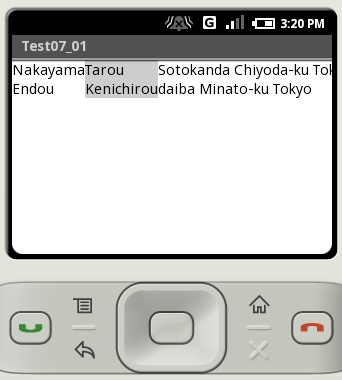
ビルド後にエミュレーター上で実行します。
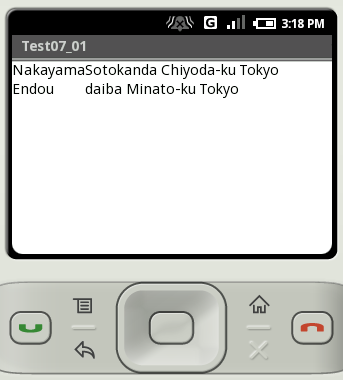
各列で必要となる横幅を確保すると、全ての列を1つの行に表示することが出来ません。今回のサンプルでは2列目が折り畳み可能となっているので、2列目が折り畳まれて表示されていません。
なお、折り畳み可能な列を設定しない場合は次のように表示されます。
( Written by Tatsuo Ikura )
