テーブルの削除
広告
作成されたテーブルを削除する方法も確認します。テーブルの作成と同じく「execSQL」メソッドを使ってテーブルを削除するSQL文を指定することになります。
SQLiteにおけるテーブル削除のための基本的なSQL文は次のようになります。
drop table table_name;
具体的には次のように記述します。
SQLiteDatabase db;
try {
    db = openDatabase("db01_01", null);
} catch (FileNotFoundException e) {
    db = null;
}

String sql = "drop table shouhin;";

try {
    db.execSQL(sql);
} catch (SQLException e) {
    Log.e("ERROR", e.toString());
}
サンプルプログラム
それでは実際に試してみます。プロジェクトを作成しソースコードを次のように変更しました。
package jp.javadrive.android;

import android.app.Activity;
import android.os.Bundle;
import android.widget.LinearLayout;
import android.view.View;
import android.view.ViewGroup;
import android.widget.Button;
import android.view.View.OnClickListener;
import android.content.Context;
import android.database.sqlite.SQLiteDatabase;
import java.io.FileNotFoundException;
import android.database.SQLException;
import android.util.Log;

public class Test02_01 extends Activity implements OnClickListener{
    private final int FP = ViewGroup.LayoutParams.FILL_PARENT;
    private final int WC = ViewGroup.LayoutParams.WRAP_CONTENT;
    private Button button1;
    private SQLiteDatabase db;

    private int DB_VERSION = 1;
    private int DB_MODE = Context.MODE_PRIVATE;
    private String DB_NAME = "db_table_02";

    @Override protected void onCreate(Bundle icicle) {
        super.onCreate(icicle);

        db = null;

        LinearLayout linearLayout = new LinearLayout(this);
        linearLayout.setOrientation(LinearLayout.HORIZONTAL);
        setContentView(linearLayout);

        button1 = new Button(this);
        button1.setText("Delete Table");
        button1.setOnClickListener(this);
        linearLayout.addView(button1, createParam(WC, WC));

        openDatabase();
        createTable("table1");
        createTable("table2");
    }

    private LinearLayout.LayoutParams createParam(int w, int h){
        return new LinearLayout.LayoutParams(w, h);
    }

    private void openDatabase(){
        try {
            db = openDatabase(DB_NAME, null);
        } catch (FileNotFoundException e) {
            try {
                db = createDatabase(DB_NAME, DB_VERSION, DB_MODE, null);
            } catch (FileNotFoundException e2) {
                db = null;
                Log.e("ERROR", e2.toString());
            }
        }
    }

    private void createTable(String table_name){
        String sql = "create table " + table_name + " ("
            + "id integer primary key autoincrement, "
            + "name text not null);";

        try {
            db.execSQL(sql);
        } catch (SQLException e) {
            Log.e("ERROR", e.toString());
        }
    }

    public void onClick(View v) {
        if (v == button1){
            String sql = "drop table table1";

            try {
                db.execSQL(sql);
            } catch (SQLException e) {
                Log.e("ERROR", e.toString());
            }
        }
    }
}
ビルド後にエミュレーター上で実行します。

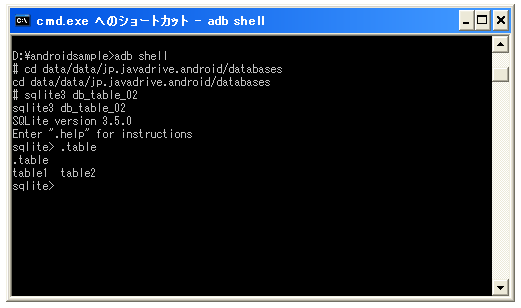
画面が表示された時点でデータベースを開き、テーブルを二つ作成しています。この時点でシェルで確認してみると次のようになっています。
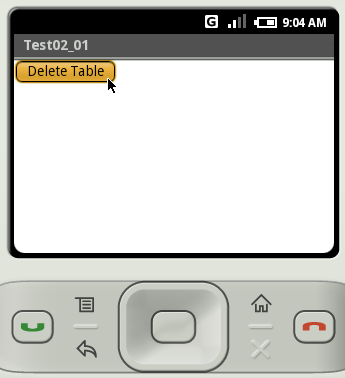
エミュレーターに戻り「Delete Table」ボタンをクリックすると「table1」テーブルを削除します。
再度シェルで確認してみます。
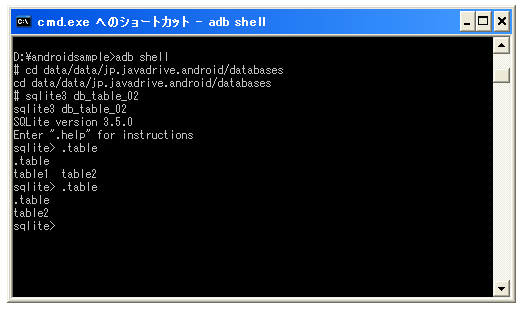
テーブルが削除されていることが確認できました。
( Written by Tatsuo Ikura )
