SQL文を指定してデータを取得
テーブルからデータを取得するにはSQL文を用意してクエリを発行します。SQL文に適合するデータがあった場合に、データベースからデータを受け取ります。SQL文を指定してクエリを発行するに「SQLiteDatabase」クラスで用意されている「query」メソッドを使います。念のためもう一度メソッドの説明を記述します。
query
public Cursor query(String sql, String[] selectionArgs)
Runs the provided SQL and returns a cursor over the result set.

Parameters:
  sql  the SQL query. The SQL string must not be ; terminated
  selectionArgs  You may include ?s in where clause in the query, which
    will be replaced by the values from selectionArgs. The values will
    be bound as Strings.
Returns:
  A Cursor object, which is positioned before the first entry
1番目の引数にはクエリとして発行するSQL文を記述します。
2番目の引数にはSQL文中のWHERE句において条件部分に直接値を記述する代わりに「?」を代わりに記述し、値は別途2番目の引数で指定する場合に利用します。「?」を記述した文だけ2番目の引数でStringクラスの配列に値を格納しておきます。詳しくは次のページで確認します。
なおSQLiteにおけるSQL文の記述方法について詳しくは見ていきませんが、基本的なSQL文は次のようになります。
SELECT column_name1, column_name2, ... FROM table_name;
SELECT column_name, column_name2, ... FROM table_name WHERE 条件式;
メソッドを実行するとSQL文に適合したデータをデータベースから取得できます。この時「android.database.Cursor」インターフェースを実装したクラスのオブジェクトとして取得することが出来ます。
「Cursor」インターフェースについては別のページで詳しく確認しますので取りあえず気にしないで下さい。しばらくは「Cursor」インターフェースを実装した「android.database.sqlite.SQLiteCursor」クラスのオブジェクトとし処理していきます。
具体的には次のように記述します。
SQLiteDatabase db;
try {
    db = openDatabase("db01_01", null);
} catch (FileNotFoundException e) {
    db = null;
}

String sql = "select * from shouhin;";
SQLiteCursor c = (SQLiteCursor)db.query(sql, null);
サンプルプログラム
それでは実際に試してみます。プロジェクトを作成しソースコードを次のように変更しました。
package jp.javadrive.android;

import android.app.Activity;
import android.os.Bundle;
import android.widget.LinearLayout;
import android.view.View;
import android.view.ViewGroup;
import android.widget.TextView;
import android.widget.EditText;
import android.widget.Button;
import android.view.View.OnClickListener;
import android.content.Context;
import android.database.sqlite.SQLiteDatabase;
import java.io.FileNotFoundException;
import android.database.SQLException;
import android.content.ContentValues;
import android.util.Log;
import android.database.sqlite.SQLiteCursor;

public class Test01_01 extends Activity implements OnClickListener{
    private final int FP = ViewGroup.LayoutParams.FILL_PARENT;
    private final int WC = ViewGroup.LayoutParams.WRAP_CONTENT;

    private Button buttonInsert;
    private Button buttonDisp;
    private EditText editName;
    private EditText editPrice;

    private SQLiteDatabase db;

    private int DB_VERSION = 1;
    private int DB_MODE = Context.MODE_PRIVATE;
    private String DB_NAME = "db_select_01";
    private String TABLE_NAME = "product";
    private TextView textResult;

    @Override protected void onCreate(Bundle icicle) {
        super.onCreate(icicle);

        db = null;

        LinearLayout linearLayout = new LinearLayout(this);
        linearLayout.setOrientation(LinearLayout.VERTICAL);
        setContentView(linearLayout);


        LinearLayout dataLayout = new LinearLayout(this);
        dataLayout.setOrientation(LinearLayout.HORIZONTAL);
        linearLayout.addView(dataLayout, createParam(WC, WC));

        TextView textName = new TextView(this);
        textName.setText("name");
        dataLayout.addView(textName, createParam(WC, WC));

        editName = new EditText(this);
        editName.setWidth(80);
        dataLayout.addView(editName, createParam(WC, WC));

        TextView textPrice = new TextView(this);
        textPrice.setText("price");
        dataLayout.addView(textPrice, createParam(WC, WC));

        editPrice = new EditText(this);
        editPrice.setWidth(80);
        dataLayout.addView(editPrice, createParam(WC, WC));


        LinearLayout buttonLayout = new LinearLayout(this);
        buttonLayout.setOrientation(LinearLayout.HORIZONTAL);
        linearLayout.addView(buttonLayout, createParam(WC, WC));

        buttonInsert = new Button(this);
        buttonInsert.setText("INSERT");
        buttonInsert.setOnClickListener(this);
        buttonLayout.addView(buttonInsert, createParam(WC, WC));


        LinearLayout listLayout = new LinearLayout(this);
        listLayout.setOrientation(LinearLayout.HORIZONTAL);
        linearLayout.addView(listLayout, createParam(WC, WC));

        buttonDisp = new Button(this);
        buttonDisp.setText("Disp Data");
        buttonDisp.setOnClickListener(this);
        listLayout.addView(buttonDisp, createParam(WC, WC));

        textResult = new TextView(this);
        textResult.setText("");
        listLayout.addView(textResult, createParam(WC, WC));


        openDatabase();
    }

    private LinearLayout.LayoutParams createParam(int w, int h){
        return new LinearLayout.LayoutParams(w, h);
    }

    private void openDatabase(){
        try {
            db = openDatabase(DB_NAME, null);
        } catch (FileNotFoundException e) {
            try {
                db = createDatabase(DB_NAME, DB_VERSION, DB_MODE, null);
                createTable();
            } catch (FileNotFoundException e2) {
                db = null;
                Log.e("ERROR", e2.toString());
            }
        }
    }

    private void createTable(){
        String sql = "create table " + TABLE_NAME + " ("
            + "id integer primary key autoincrement, "
            + "name text not null, "
            + "price integer);";

        try {
            db.execSQL(sql);
        } catch (SQLException e) {
            Log.e("ERROR", e.toString());
        }
    }

    public void onClick(View v) {
        if (v == buttonInsert){
            String name =  editName.getText().toString();
            String price =  editPrice.getText().toString();

            ContentValues cv = new ContentValues();
            cv.put("name", name);
            cv.put("price", price);
            db.insert(TABLE_NAME, null, cv);

            editName.setText("");
            editPrice.setText("");
        }else if (v == buttonDisp){
            String sql = "select * from " + TABLE_NAME + ";";

            try {
                SQLiteCursor c = (SQLiteCursor)db.query(sql, null);

                int rowcount = c.count();
                StringBuffer sb = new StringBuffer();
                c.first();

                for (int i = 0; i < rowcount ; i++) {
                    int id = c.getInt(0);
                    String name = c.getString(1);
                    int price = c.getInt(2);

                    sb.append("[" + id + "," + name + "," + price + "]¥n");

                    c.next();
                }

                textResult.setText(new String(sb));
            } catch (SQLException e) {
                Log.e("ERROR", e.toString());
            }
        }
    }
}
ビルド後にエミュレーター上で実行します。
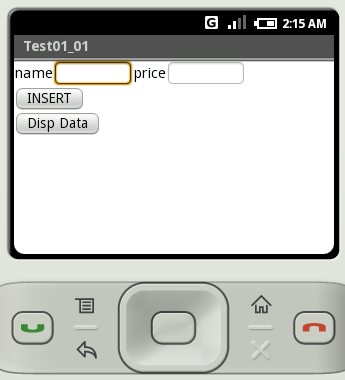
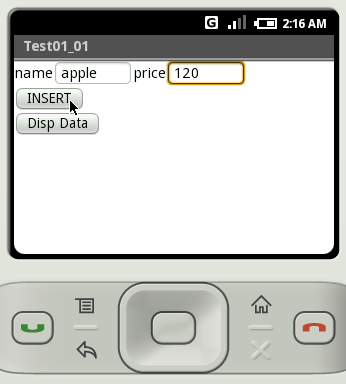
起動した直後はデータベースにデータが含まれていませんのでまずデータの追加を行います。「name」と「price」に値を入力して「INSERT」ボタンをクリックして下さい。
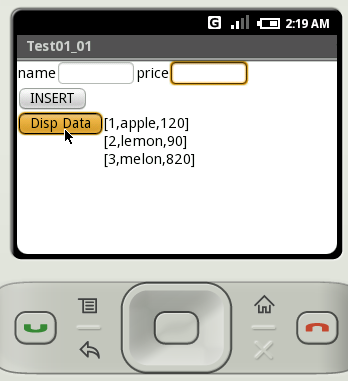
「Disp Data」ボタンをクリックすると現在データベースに登録されているデータを全て取得して表示します。

データをあと2つほど追加した後で改めてデータを取得してみます。
( Written by Tatsuo Ikura )
