updateメソッドによるデータの更新
データ追加の場合と同じくデータ更新のためのメソッドも用意されています。「SQLiteDatabase」クラスで用意されている「update」メソッドを使います。
update
public int update(String table,
                  ContentValues values,
                  String whereClause,
                  String[] whereArgs)
Convenience method for updating rows in the database.

Parameters:
  table  the table to update in
  values  a map from column names to new column values. null is a valid
    value that will be translated to NULL.
  whereClause  the optional WHERE clause to apply when updating. Passing
    null will update all rows.
Returns:
  the number of rows affected
1番目の引数には対象のテーブル名を指定します。
2番目の引数には更新するデータの各カラムに対する値を保持している「ContentValues」クラスのオブジェクトを指定します。
3番目の引数には更新の対象となるレコードを特定するための条件を記述します。SQL文で言えばWHERE句の箇所に該等します。例えば「id=10」などです。
4番目の引数もレコード特定のための条件だと思われますが説明が無い為詳細が分かりませんでした。
具体的には次のように記述します。
SQLiteDatabase db;
try {
    db = openDatabase("db01_01", null);
} catch (FileNotFoundException e) {
    db = null;
}

ContentValues cv = new ContentValues();
cv.put("name", "orange");
cv.put("price", 100);

db.update("table_name", cv, "id = 1", null);
サンプルプログラム
それでは実際に試してみます。プロジェクトを作成しソースコードを次のように変更しました。
package jp.javadrive.android;

import android.app.Activity;
import android.os.Bundle;
import android.widget.LinearLayout;
import android.view.View;
import android.view.ViewGroup;
import android.widget.TextView;
import android.widget.EditText;
import android.widget.Button;
import android.view.View.OnClickListener;
import android.content.Context;
import android.database.sqlite.SQLiteDatabase;
import java.io.FileNotFoundException;
import android.database.SQLException;
import android.content.ContentValues;
import android.util.Log;

public class Test07_01 extends Activity implements OnClickListener{
    private final int FP = ViewGroup.LayoutParams.FILL_PARENT;
    private final int WC = ViewGroup.LayoutParams.WRAP_CONTENT;

    private Button buttonInsert;
    private Button buttonUpdate;
    private EditText editId;
    private EditText editName;
    private EditText editPrice;

    private SQLiteDatabase db;

    private int DB_VERSION = 1;
    private int DB_MODE = Context.MODE_PRIVATE;
    private String DB_NAME = "db_data_07";
    private String TABLE_NAME = "product";

    @Override protected void onCreate(Bundle icicle) {
        super.onCreate(icicle);

        db = null;

        LinearLayout linearLayout = new LinearLayout(this);
        linearLayout.setOrientation(LinearLayout.VERTICAL);
        setContentView(linearLayout);


        LinearLayout dataLayout = new LinearLayout(this);
        dataLayout.setOrientation(LinearLayout.HORIZONTAL);
        linearLayout.addView(dataLayout, createParam(WC, WC));

        TextView textId = new TextView(this);
        textId.setText("id");
        dataLayout.addView(textId, createParam(WC, WC));

        editId = new EditText(this);
        editId.setWidth(40);
        dataLayout.addView(editId, createParam(WC, WC));

        TextView textName = new TextView(this);
        textName.setText("name");
        dataLayout.addView(textName, createParam(WC, WC));

        editName = new EditText(this);
        editName.setWidth(80);
        dataLayout.addView(editName, createParam(WC, WC));

        TextView textPrice = new TextView(this);
        textPrice.setText("price");
        dataLayout.addView(textPrice, createParam(WC, WC));

        editPrice = new EditText(this);
        editPrice.setWidth(80);
        dataLayout.addView(editPrice, createParam(WC, WC));


        LinearLayout buttonLayout = new LinearLayout(this);
        buttonLayout.setOrientation(LinearLayout.HORIZONTAL);
        linearLayout.addView(buttonLayout, createParam(WC, WC));

        buttonInsert = new Button(this);
        buttonInsert.setText("INSERT");
        buttonInsert.setOnClickListener(this);
        buttonLayout.addView(buttonInsert, createParam(WC, WC));

        buttonUpdate = new Button(this);
        buttonUpdate.setText("UPDATE");
        buttonUpdate.setOnClickListener(this);
        buttonLayout.addView(buttonUpdate, createParam(WC, WC));

        openDatabase();
    }

    private LinearLayout.LayoutParams createParam(int w, int h){
        return new LinearLayout.LayoutParams(w, h);
    }

    private void openDatabase(){
        try {
            db = openDatabase(DB_NAME, null);
        } catch (FileNotFoundException e) {
            try {
                db = createDatabase(DB_NAME, DB_VERSION, DB_MODE, null);
                createTable();
            } catch (FileNotFoundException e2) {
                db = null;
                Log.e("ERROR", e2.toString());
            }
        }
    }

    private void createTable(){
        String sql = "create table " + TABLE_NAME + " ("
            + "id integer primary key autoincrement, "
            + "name text not null, "
            + "price integer);";

        try {
            db.execSQL(sql);
        } catch (SQLException e) {
            Log.e("ERROR", e.toString());
        }
    }

    public void onClick(View v) {
        String id =  editId.getText().toString();
        String name =  editName.getText().toString();
        String price =  editPrice.getText().toString();

        if (v == buttonInsert){
            ContentValues cv = new ContentValues();
            cv.put("name", name);
            cv.put("price", price);
            db.insert(TABLE_NAME, null, cv);
        }else if (v == buttonUpdate){
            ContentValues cv = new ContentValues();
            cv.put("name", name);
            cv.put("price", price);
            db.update(TABLE_NAME, cv, "id = " + id, null);
        }

        editId.setText("");
        editName.setText("");
        editPrice.setText("");
    }
}
ビルド後にエミュレーター上で実行します。
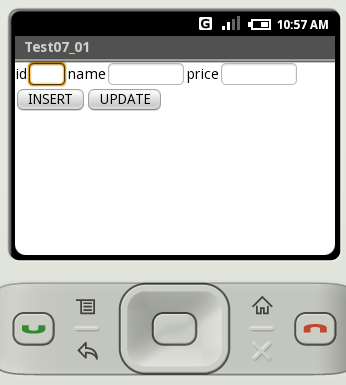
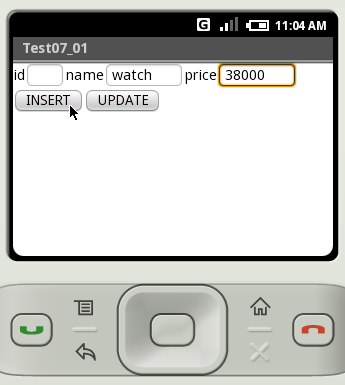
まずはデータを挿入します。「name」と「price」に値を入力して「INSERT」ボタンをクリックして下さい。データがテーブルに追加されます。何個かのデータを追加しておきました。
データが追加されたかどうかシェルで確認してみます。
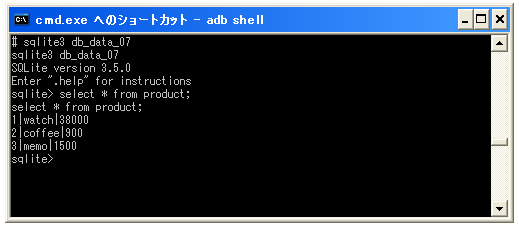
データが追加されていることが確認できました。
では更新を行います。更新したいレコードのIDを「id」の箇所に入力し、新しい値を「name」と「price」に値を入力して「UPDATE」ボタンをクリックして下さい。

データが更新されたかどうかシェルで確認してみます。
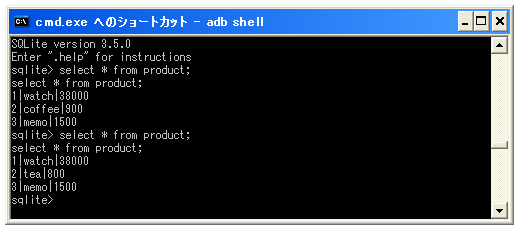
データが更新されていることが確認できました。
( Written by Tatsuo Ikura )
