- Home ›
- Android入門 ›
- MapViewクラス ›
- HERE
指定の座標へ移動
広告
現在表示されている位置から指定した座標へ移動する方法を確認します。「MapController」クラスで用意されている「animateTo」メソッドを使います。
animateTo
public void animateTo(Point point)
Start animating the map towards the given point.

Parameters:
  point  座標
引数に移動したい地図の座標を「Point」クラスのオブジェクトで指定します。地図の中央の座標で指定して下さい。
具体的には次のように記述します。
@Override public void onCreate(Bundle icicle) {
    super.onCreate(icicle);

    MapView map = new MapView(this);
    MapController mc = map.getController();

    Point point = new Point(35690921, 139700258);
    mc.centerMapTo(point, true);

    Point newpoint = new Point(35658517, 139701334);
    mc.animateTo(newpoint);
}
「centerMapTo」メソッドも「animateTo」メソッドも指定した座標に地図を設定することに違いはありません。ただ「centerMapTo」メソッドで座標を指定した場合には新しい座標へ切り替わって表示されるのに対して「animateTo」メソッドの場合は現在表示されている位置からスムーズにスクロールして新しい座標へ移動します。
サンプルプログラム
それでは実際に試してみます。プロジェクトを作成しソースコードを次のように変更しました。
package jp.javadrive.android;

import com.google.android.maps.MapActivity;
import android.os.Bundle;
import com.google.android.maps.MapView;
import android.view.View;
import android.view.ViewGroup;
import android.widget.LinearLayout;
import android.widget.Button;
import android.graphics.Color;
import android.view.View.OnClickListener;
import com.google.android.maps.Point;
import com.google.android.maps.MapController;

public class Test08_01 extends MapActivity
    implements OnClickListener{

    private final int FP = ViewGroup.LayoutParams.FILL_PARENT;
    private final int WC = ViewGroup.LayoutParams.WRAP_CONTENT;

    private MapView map;
    private Button buttonShinjyuku;
    private Button buttonShibuya;
    private MapController mc;

    @Override public void onCreate(Bundle icicle) {
        super.onCreate(icicle);

        LinearLayout linearLayout = new LinearLayout(this);
        linearLayout.setOrientation(LinearLayout.VERTICAL);
        setContentView(linearLayout);


        LinearLayout btnLinearLayout = new LinearLayout(this);
        btnLinearLayout.setOrientation(LinearLayout.HORIZONTAL);
        btnLinearLayout.setBackgroundColor(Color.BLACK);

        buttonShinjyuku = new Button(this);
        buttonShinjyuku.setText("Shinjyuku");
        buttonShinjyuku.setOnClickListener(this);

        buttonShibuya = new Button(this);
        buttonShibuya.setText("Shibuya");
        buttonShibuya.setOnClickListener(this);

        btnLinearLayout.addView(buttonShinjyuku, createParam(WC, WC));
        btnLinearLayout.addView(buttonShibuya, createParam(WC, WC));


        map = new MapView(this);
        mc = map.getController();

        Point p = createPoint(35.690921f, 139.700258f);
        mc.centerMapTo(p, false);
        mc.zoomTo(15);

        linearLayout.addView(btnLinearLayout, createParam(FP, WC));
        linearLayout.addView(map, createParam(WC, WC));
    }

    private LinearLayout.LayoutParams createParam(int w, int h){
        return new LinearLayout.LayoutParams(w, h);
    }

    public void onClick(View v) {
        if (v == buttonShinjyuku){
            Point p = createPoint(35.690921f, 139.700258f);
            mc.animateTo(p);
        }else if (v == buttonShibuya){
            Point p = createPoint(35.658517f, 139.701334f);
            mc.animateTo(p);
        }
    }

    private Point createPoint(float lat, float lng){
        Point p = new Point((int)(lat * 1000000), (int)(lng * 1000000));
        return p;
    }
}
ビルド後にエミュレーター上で実行します。
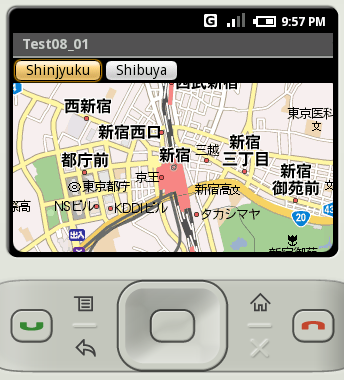
上部に並んでいる地名が書かれたボタンをクリックすると、地図が移動します。
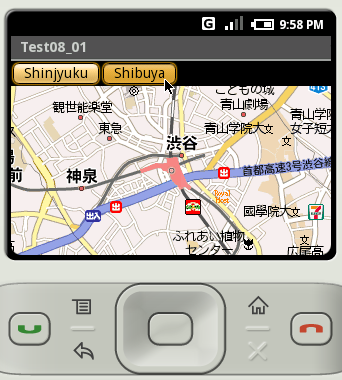
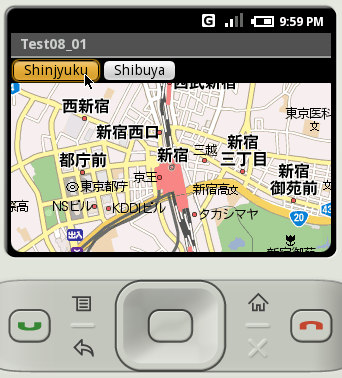
「animateTo」メソッドを使う場合は移動前の位置から移動後の位置まで地図はスクロールして移動します。ただし、移動の途中にある地図が一度も表示されていない場所があると、その部分は表示されない場合もあります。
( Written by Tatsuo Ikura )
