- Home ›
- Android入門 ›
- EditTextクラス ›
- HERE
表示色の設定
広告
表示される文字列の文字色を設定する方法を確認します。「EditText」クラスの親クラスである「TextView」クラスで用意されている「setTextColor」メソッドを使います。
setTextColor
public void setTextColor(int color)
Set the text color for all the states (normal, selected, focused) to
be this color.

Related XML Attributes:
  android:textColor

Parameters:
  color  文字色
1番目の引数に文字色を指定します。色の指定には「android.graphics.Color」クラスを使います。詳しくは「Colorクラス」を参照して下さい。
具体的には次のように記述します。
@Override protected void onCreate(Bundle icicle) {
    super.onCreate(icicle);

    EditText edit = new EditText(this);
    edit.setText("", BufferType.NORMAL);
    edit.setTextColor(Color.RED);
    setContentView(edit);
}
サンプルプログラム
それでは実際に試してみます。プロジェクトを作成しソースコードを次のように変更しました。
package jp.javadrive.android;

import android.app.Activity;
import android.os.Bundle;
import android.widget.LinearLayout;
import android.view.ViewGroup;
import android.widget.EditText;
import android.widget.TextView.BufferType;
import android.graphics.Color;

public class Test08_01 extends Activity {
    private final int FP = ViewGroup.LayoutParams.FILL_PARENT;
    private final int WC = ViewGroup.LayoutParams.WRAP_CONTENT;

    @Override protected void onCreate(Bundle icicle) {
        super.onCreate(icicle);

        LinearLayout linearLayout = new LinearLayout(this);
        linearLayout.setOrientation(LinearLayout.VERTICAL);
        setContentView(linearLayout);

        EditText edit1 = new EditText(this);
        edit1.setWidth(200);
        edit1.setText("Yamada", BufferType.NORMAL);
        edit1.setTextColor(Color.RED);
        linearLayout.addView(edit1, createParam(WC, WC));

        EditText edit2 = new EditText(this);
        edit2.setWidth(200);
        edit2.setText("Katou", BufferType.NORMAL);
        edit2.setTextColor(Color.rgb(127, 127, 0));
        linearLayout.addView(edit2, createParam(WC, WC));
    }

    private LinearLayout.LayoutParams createParam(int w, int h){
        return new LinearLayout.LayoutParams(w, h);
    }
}
ビルド後にエミュレーター上で実行します。
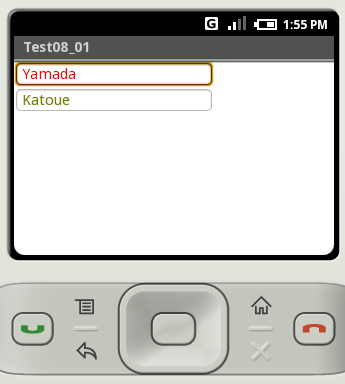
2つのテキストボックスが表示され、それぞれのテキストボックスの文字色が設定された色になっています。
( Written by Tatsuo Ikura )
