- Home ›
- Android入門 ›
- EditTextクラス ›
- HERE
パディングの設定
広告
文字列を表示する時に表示エリアとの間にパディングを設定する方法を確認します。「EditText」クラスの親クラスである「TextView」クラスで用意されている「setPadding」メソッドを使います。
setPadding
public void setPadding(int left, int top, int right, int bottom)
Sets the padding.

Parameters:
  left  the left padding in pixels
  top  the top padding in pixels
  right  the right padding in pixels
  bottom  the bottom padding in pixels
4つの引数を使って左上右下の順にパディングの量を設定します。単位はピクセルです。
具体的には次のように記述します。
@Override protected void onCreate(Bundle icicle) {
    super.onCreate(icicle);

    EditText edit = new EditText(this);
    edit.setText("", BufferType.NORMAL);
    edit.setPadding(5, 5, 5, 5);
    setContentView(edit);
}
サンプルプログラム
それでは実際に試してみます。プロジェクトを作成しソースコードを次のように変更しました。
package jp.javadrive.android;

import android.app.Activity;
import android.os.Bundle;
import android.widget.LinearLayout;
import android.view.ViewGroup;
import android.widget.EditText;
import android.widget.TextView.BufferType;

public class Test11_01 extends Activity {
    private final int FP = ViewGroup.LayoutParams.FILL_PARENT;
    private final int WC = ViewGroup.LayoutParams.WRAP_CONTENT;

    @Override protected void onCreate(Bundle icicle) {
        super.onCreate(icicle);

        LinearLayout linearLayout = new LinearLayout(this);
        linearLayout.setOrientation(LinearLayout.VERTICAL);
        setContentView(linearLayout);

        EditText edit1 = new EditText(this);
        edit1.setWidth(200);
        edit1.setText("Yamada", BufferType.NORMAL);
        linearLayout.addView(edit1, createParam(WC, WC));

        EditText edit2 = new EditText(this);
        edit2.setWidth(200);
        edit2.setText("Katou", BufferType.NORMAL);
        edit2.setPadding(10, 10, 10, 10);
        linearLayout.addView(edit2, createParam(WC, WC));
    }

    private LinearLayout.LayoutParams createParam(int w, int h){
        return new LinearLayout.LayoutParams(w, h);
    }
}
ビルド後にエミュレーター上で実行します。
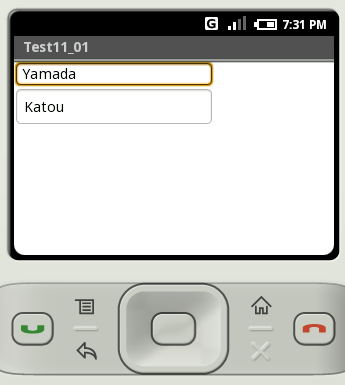
下のテキストボックスにはパディングが設定されていますので文字が表示される部分と外枠の間に余白が設定されています。
( Written by Tatsuo Ikura )
